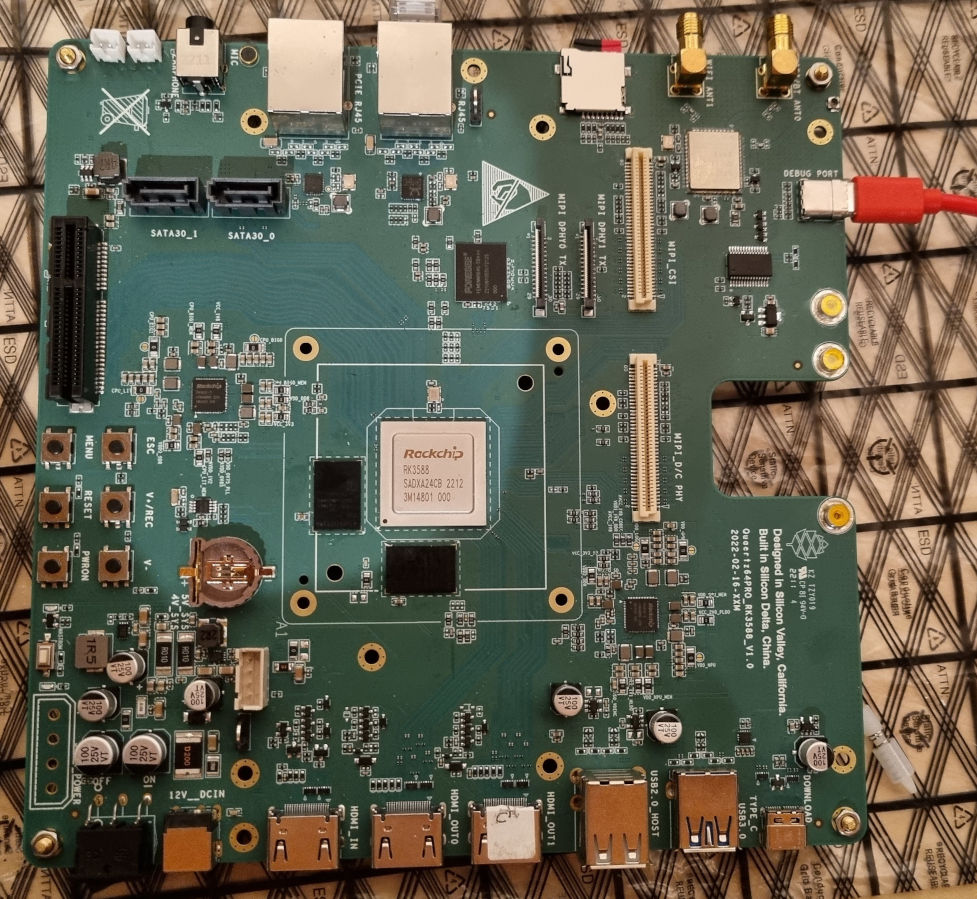
The QuartzPro64 is an ARM SBC from Pine64 built around the new Rockchip RK3588 CPU.
Before going any further, let me remind you that this board is not available to the general public. This is a development board that is only for developers who want to contribute to software development : mainline support in the Linux kernel, Linux distributions, projects,… Pine64 will probably design a board similar to their other SBCs (like the ROCKPro64 ) when the software support will be good enough for general uses. You’ll find more information about this in this announcement post on the Pine64 blog .
The RK3588 is an octa-core (4x Cortex-A76 + 4x Cortex-A55) CPU that supports up to 32GB of RAM memory, up to 4 displays, 2 Gigabit Ethernet, 2 USB 3.1, 2 USB 2.0, 4-lane PCIe3.0 and 3x PCIe 2.0. It surely has a lot of CPU power and I/Os for many usages!
The QuartzPro64 exposes many of these resources and I/O : 16GB RAM, 64GB eMMC, 2 Gigabit ethernet ports (RJ45), 2 SATA ports, µSD port, HDMI input, 2 HDMI outputs, 2 USB 2.0, 1 USB 3.0 and a PCIe 3.0 socket. You’ll find more info about the specifications of the board on the wiki page .
Since TL Lim (Pine64 founder) was kind enough to provide me with a board, I’ll do my best to contribute with the development efforts. My hope for an RK3588-based platform is that it reaches sufficient software support to make a true (and affordable) ARM64 workstation a reality!
In this post, I’ll describe the steps I’ve taken to build U-Boot and the kernel and to flash them on an SD card. Most of the developers who received the QuartzPro64 probably already know this and much much more than me! But I still think that those instructions might be useful to some current or future users of the board!
U-Boot, kernel and rootfs
The board came with Android flashed on the embedded eMMC memory. It works, it’s fine, it even displays something on the HDMI output but… we are not here to use Android, right ?
As of now, there no ready-to-run images available, which means that we’ll have to build our own Linux system to boot Linux on the QuartzPro64! Luckily, the wiki page contains a lot of useful information to get started! It’s even possible to boot the board entirely from the SD card, so we don’t have to erase the eMMC memory.
Note that most of the following instructions come from the wiki page. Thanks to all contributors of this page!
U-Boot
U-Boot is an open source bootloader commonly used on embedded systems. I used this fork of U-Boot, which is provided by CounterPillow . It’s based on the downstream (BSP) version of U-Boot provided by Rockchip. Support for the RK3588 will hopefully be added to mainline U-Boot at some point, but this vendor version will do the job for now.
Let’s build U-Boot:
git clone https://github.com/CounterPillow/uboot-qp64.git
cd uboot-qp64
make mrproper
./make.sh rk3588
This will build U-Boot and generate the files we’ll flash on the SD card (3588_spl_loader_v1.08.111.bin and u-boot.bin).
The kernel
As suggested on the wiki page, I’ll use neggles’ branch of the Linux kernel , which is currently based on the development version 6.1 of the Linux kernel.
Since the kernel needs to be cross-compiled (from the x86_64 architecture of my desktop computer to ARM64 for the RK3588), I downloaded the ARM toolchain (compiler, linker, debugger) on the ARM website .
Let’s clone the project and configure the kernel:
git clone https://github.com/neggles/linux-quartz64.git
cd linux-quartz64
make ARCH=arm64 CROSS_COMPILE=/path/to/arm-gnu-toolchain-12.2.rel1-x86_64-aarch64-none-linux-gnu/bin/aarch64-none-linux-gnu- menuconfig
At his point, I had to manually enable a few options to make the SD card reader, SATA and PCIe working :
CONFIG_MFD_RK8XX=y
CONFIG_MFD_RK8XX_I2C=y
CONFIG_MFD_RK8XX_SPI=y
CONFIG_PHY_ROCKCHIP_NANENG_COMBO_PHY=y
CONFIG_PHY_ROCKCHIP_SNPS_PCIE3=y
I guess they will be enabled by default in the future.
Now, let’s build the kernel:
make ARCH=arm64 CROSS_COMPILE=/path/to/arm-gnu-toolchain-12.2.rel1-x86_64-aarch64-none-linux-gnu/bin/aarch64-none-linux-gnu- all -j16
The last time I built a Linux kernel was probably more than 10 years ago, when I was running Gentoo on my good old Core2Duo laptop! Building the Linux kernel took so long at that time… Now, on my 16-cores desktop computer, the build took just a few minutes, impressive!
The kernel image is generated in arch/arm64/boot/Image and the corresponding DTS/DTB files in arch/arm64/boot/dts/rockchip/rk3588-quartzpro64.dts and arch/arm64/boot/dts/rockchip/rk3588-quartzpro64.dtb.
Root filesystem
The root filesystem does not require any special preparation. We’ll just uncompress it on the SD card.
Prepare the SD card
While the board has an embedded eMMC memory, I decided to not use it as a first step. Additional tools are needed to flash it, and I wanted to keep the current installation of Android intact so I can check that the board is still working fine in case of issues. Neggles’ branch of the Linux kernel supports the SD card reader, so the installation will be easier.
Let’s start by creating a few partitions (replace /dev/sdX with the device corresponding to your SD card) :
parted -s /dev/sdX mklabel gpt
parted -s /dev/sdX mkpart loader 64s 8MiB
parted -s /dev/sdX mkpart uboot 8MiB 16MiB
parted -s /dev/sdX mkpart env 16MiB 32MiB
parted -s /dev/sdX mkpart efi fat32 32MiB 544MiB
parted -s /dev/sdX set 4 boot on
Flash SPL and U-Boot :
dd if=rk3588_spl_loader_v1.08.111.bin of=/dev/sdX1
dd if=uboot.img of=/dev/sdX2
Those 2 builds files were generated when we built U-Boot above.
Create the file system on the boot partition:
mkfs.vfat -n "efi" /dev/sdX4
Mount it:
mount /dev/sdX4 /mnt/sdcardboot
Create and edit the file /mnt/sdcardboot/extlinux/extlinux.conf:
default l0
menu title QuartzPro64 Boot Menu
prompt 0
timeout 50

label l0
menu label Boot Linux Kernel SDMMC
linux /Image
fdt /rk3588-quartzpro64.dtb
append earlycon=uart8250,mmio32,0xfeb50000 console=ttyS2,1500000n8 root=/dev/mmcblk1p5 rw rootwait
This file describes how to load the Linux kernel
-
The kernel image is located in
/Image -
The device tree is in
/rk3588-quartzpro64.dts -
The root file system will be mounted from
/dev/mmcblk1p5, which is the 5th partition of the SD card
Don’t forget to copy the Linux kernel image from linux-quartz64/arch/arm64/boot/Image to /mnt/sdcardboot/Image and the DTB file from linux-quartz64/arch/arm64/boot/dts/rockchip/rk3588-quartzpro64.dtb to /mnt/sdcardboot/rk3588-quartzpro64.dtb and then umount /dev/sdcardboot.
The last step consists in creating the 5th partition that will contain the root file system:
parted -s /dev/sdX mkpart root ext4 544MiB 4GiB
This creates a 4GiB partition. You can apply here any value you like, according to your SD card size.
Format it as EXT4, mount it and copy the ArchLinuxARM root FS:
mkfs.ext4 /dev/sdX5
mount /dev/sdX5 /mnt/sdcardroot
bsdtar -xpf ArchLinuxARM-aarch64-latest.tar.gz -C /mnt/sdcardroot
umount /dev/sdX5
The 1st boot!
HDMI output is not yet supported, so let’s connect a USB cable on the USB-C port labelled DEBUG PORT (next to the WiFi antennas) and use any serial terminal application on the computer to see the outputs of the QuartzPro64. I’ll use picocom:
picocom --baud 1500000 /dev/ttyUSB0
You’ll find the complete bootlog here : bootlog.txt .
First, U-Boot is loading and running. It’ll display a prompt. Simply hit ENTER or wait a few second to load the kernel:
...
Scanning mmc 1:4...
Found /extlinux/extlinux.conf
Retrieving file: /extlinux/extlinux.conf
reading /extlinux/extlinux.conf
464 bytes read in 4 ms (113.3 KiB/s)
QuartzPro64 Boot Menu
1:      Boot Linux Kernel SDMMC
Enter choice: 1
...
Then U-Boot reads the kernel image and the DTB file and runs the kernel:
...
Retrieving file: /Image
reading /Image
37554688 bytes read in 3013 ms (11.9 MiB/s)
append: earlycon=uart8250,mmio32,0xfeb50000 console=ttyS2,1500000n8 loglevel=8 root=/dev/mmcblk1p5 rw rootwait
Retrieving file: /rk3588-quartzpro64.dtb
reading /rk3588-quartzpro64.dtb
76045 bytes read in 9 ms (8.1 MiB/s)
Fdt Ramdisk skip relocation
No misc partition
## Flattened Device Tree blob at 0x0a100000
   Booting using the fdt blob at 0x0a100000
   Using Device Tree in place at 000000000a100000, end 000000000a11590c
can't found rockchip,drm-logo, use rockchip,fb-logo
WARNING: could not set reg FDT_ERR_BADOFFSET.
failed to reserve fb-loader-logo memory
Adding bank: 0x00200000 - 0x08400000 (size: 0x08200000)
Adding bank: 0x09400000 - 0xf0000000 (size: 0xe6c00000)
Adding bank: 0x100000000 - 0x3fc000000 (size: 0x2fc000000)
Adding bank: 0x3fc500000 - 0x3fff00000 (size: 0x03a00000)
Total: 5004.193 ms

Starting kernel ...
...
Finally, the Linux prompt appears:
Arch Linux 6.1.0-gaf03b9522db5-dirty (ttyS2)

alarm login:
User/password are simply root and root.
And that’s it! You’ve just built your own custom linux kernel and ran it on your QuartzPro64!
Where to go from here?
Linux 6.1 is now running on the board. You can run any experiment you like, follow up with all the development efforts and also take part in them!
Currently, the following devices are supported:
-
the SD card reader
-
eMMC
-
the debug serial port
-
both Gbe NICs
-
the 1st SATA port
-
the PCIe port