I’ve already tried in the past to run some NVRs to monitor surveillance camera on ARM SBC, but the performances were a bit underwhelming : it was too slow, it would miss events while it was recording the previous ones, and the CPU would be maxed out all of the time.
But I reconsidered this with the RK3588 since it’s way more powerful than the other SBCs I had the opportunity to use so far.
Since I’m using Proxmox (see this previous article where documented the installation of Armbian and Proxmox on the OrangePi5+ ), I created a new container to run Frigate. First, I downloaded a new container template. I choose an Alpine container because they are very lightweight.
And then I created the container using this template. I assigned a virtual disk of 50GB, 8GB of RAM and 4 CPU cores.
Once the container is created and started, installing Frigate using Docker is really easy :
-
Create a
docker-compose.yamlfile. Here mine for reference:services: frigate: container_name: frigate privileged: true # this may not be necessary for all setups restart: unless-stopped image: ghcr.io/blakeblackshear/frigate:stable shm_size: "64mb" # update for your cameras based on calculation above devices: - /dev/apex_0:/dev/apex_0 # passes a PCIe Coral, follow driver instructions here https://coral.ai/docs/m2/get-started/#2a-on-linux volumes: - /etc/localtime:/etc/localtime:ro - /root/frigate/config.yml:/config/config.yml - /root/frigate/storage:/media/frigate - /root/frigate/data:/data - type: tmpfs # Optional: 1GB of memory, reduces SSD/SD Card wear target: /tmp/cache tmpfs: size: 1000000000 ports: - "5000:5000" - "8554:8554" # RTSP feeds - "8555:8555/tcp" # WebRTC over tcp - "8555:8555/udp" # WebRTC over udp environment: FRIGATE_RTSP_PASSWORD: "password" ``` -
Create a configuration file for Frigate :
config.yml. Here’s what worked in my case:My test camera: # <------ Name the camera ffmpeg: inputs: - path: rtsp://user::pass@192.168.1.201 # <----- The stream you want to use for detection roles: - detect - record detect: enabled: True # <---- disable detection until you have a working camera feed width: 1920 # <---- update for your camera's resolution height: 1080 # <---- update for your camera's resolution record: enabled: true snapshots: enabled: True objects: track: - person - cat - dog - bird ``` -
Start the container :
docker-compose up -d
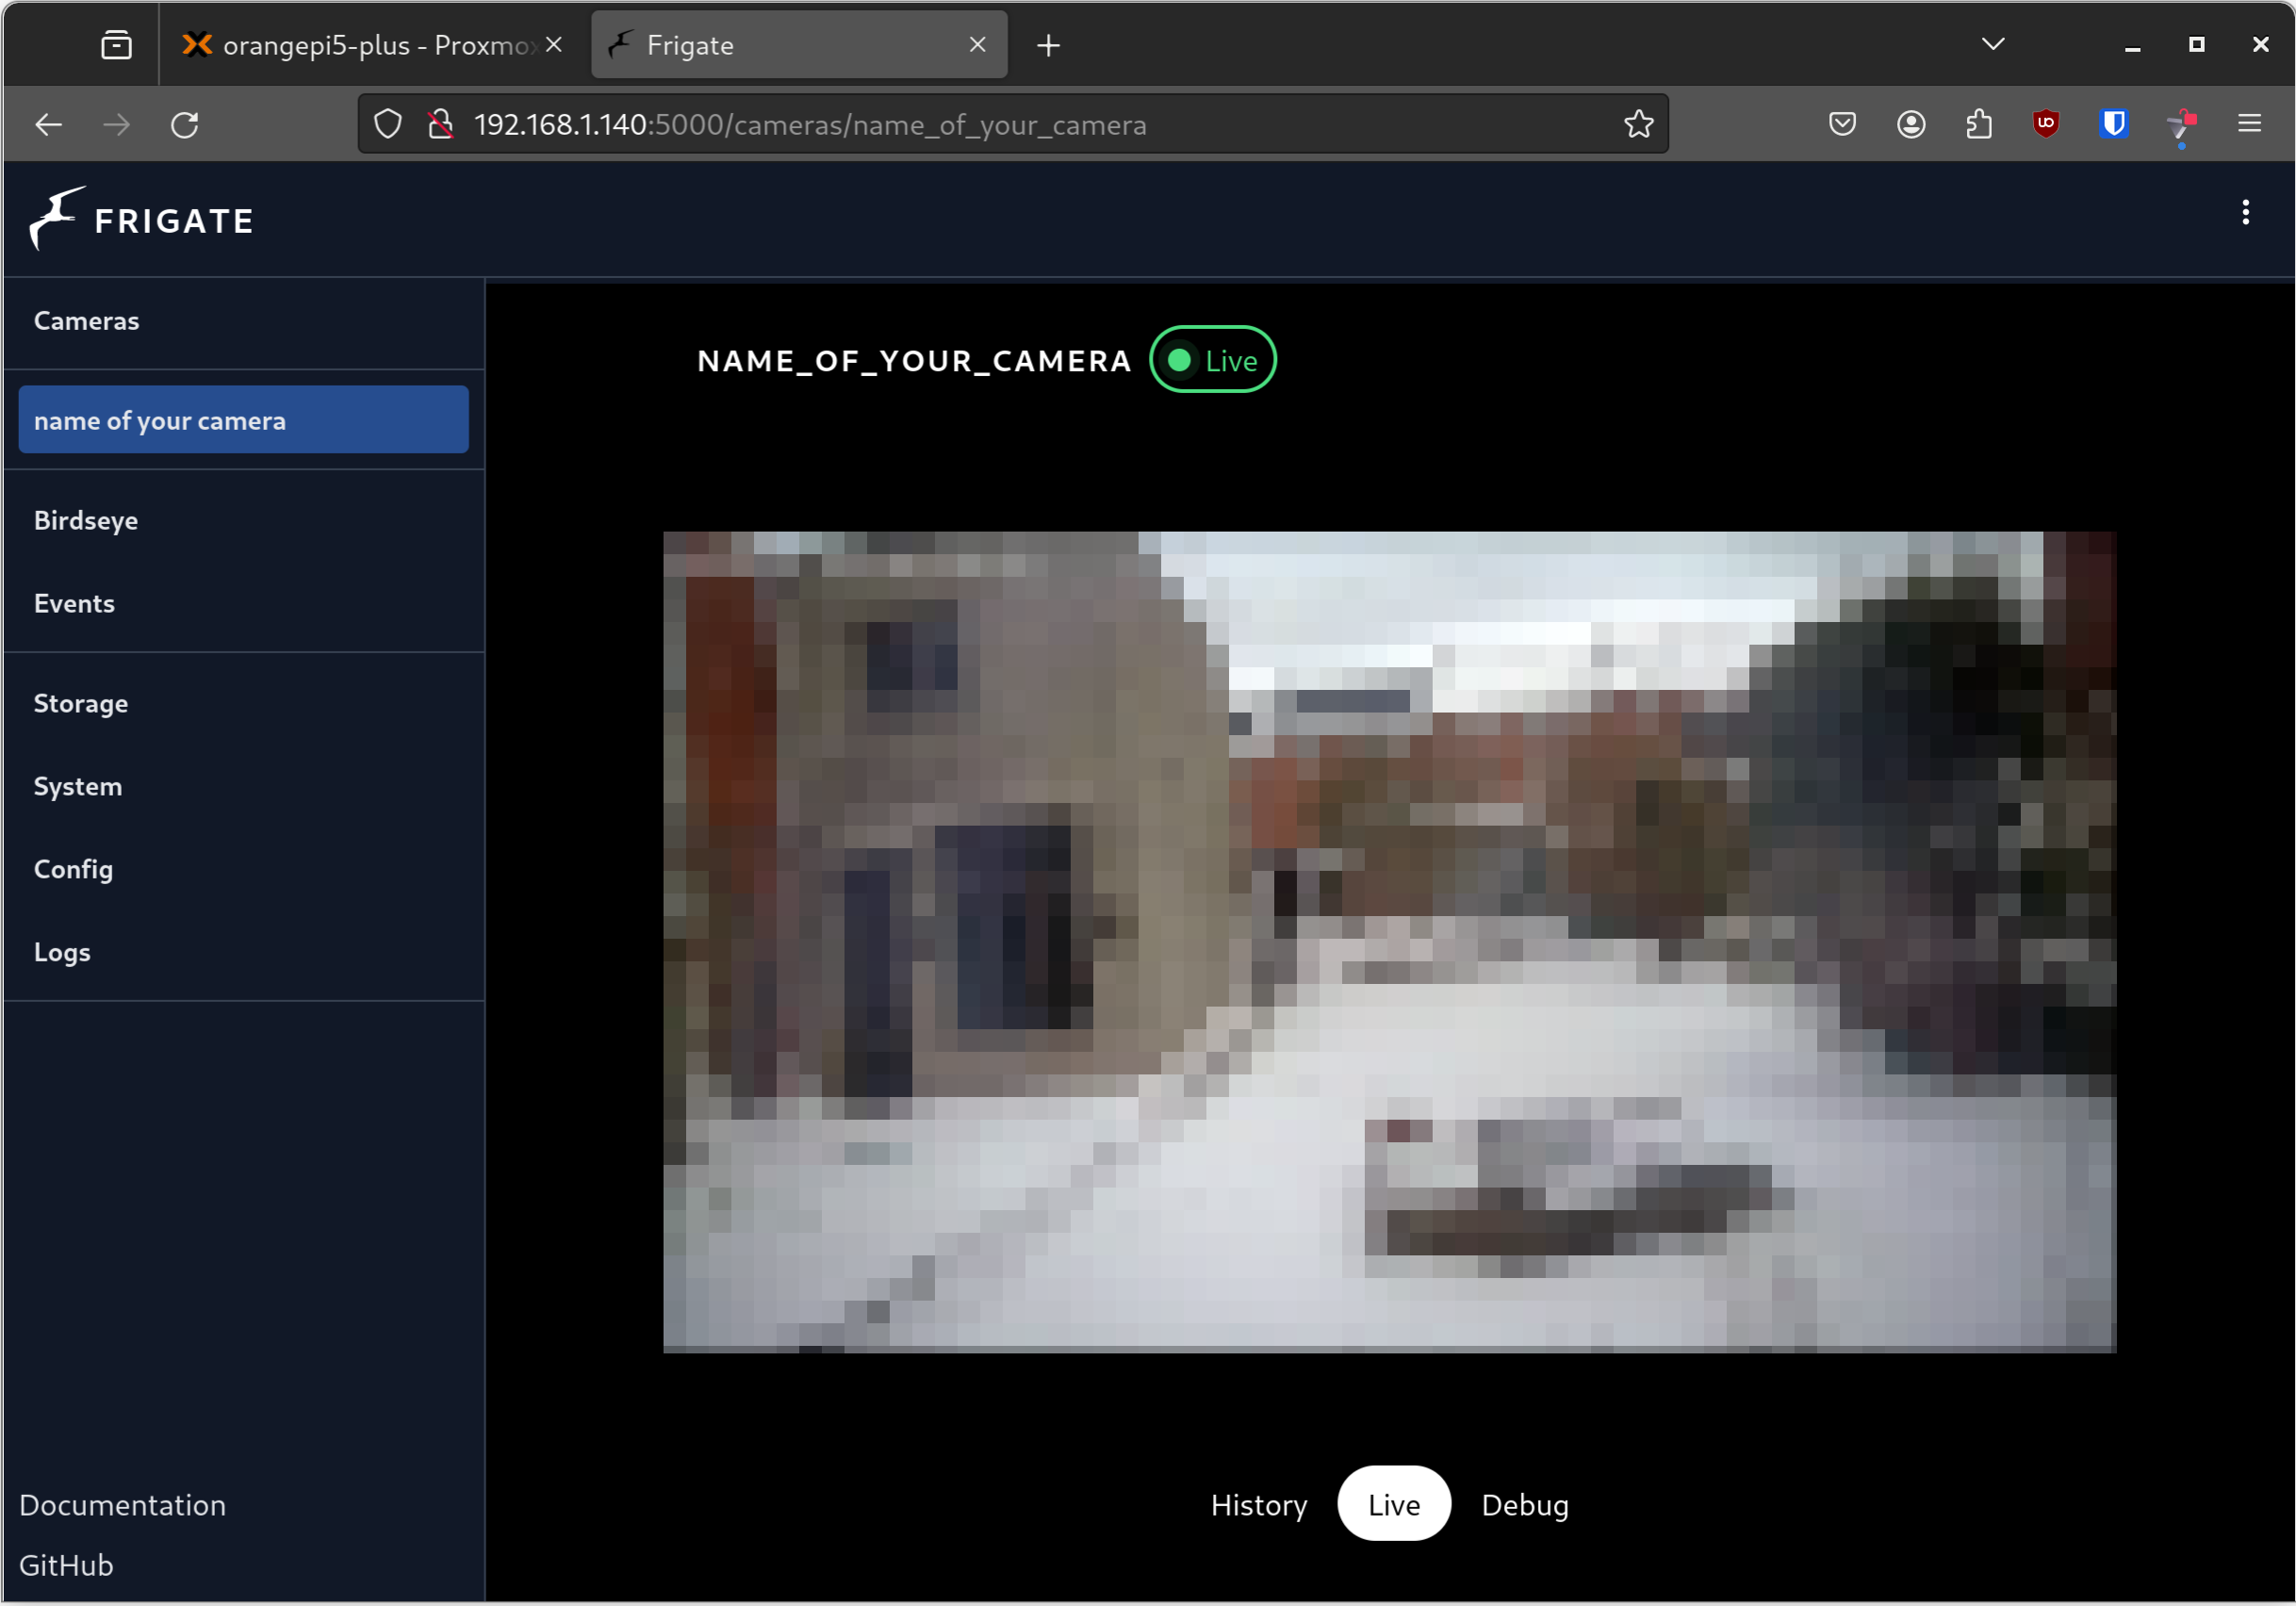
And that’s it : it just works! The most difficult part was to find the actual URL, user and password of my random cheap WiFi camera from Aliexpress…
Using this configuration, Frigate is using a CPU implementation for objects detection. This is fine on the RK3588, but we can do better : using a TPU to run the AI object detection model and reduce the load on the CPU
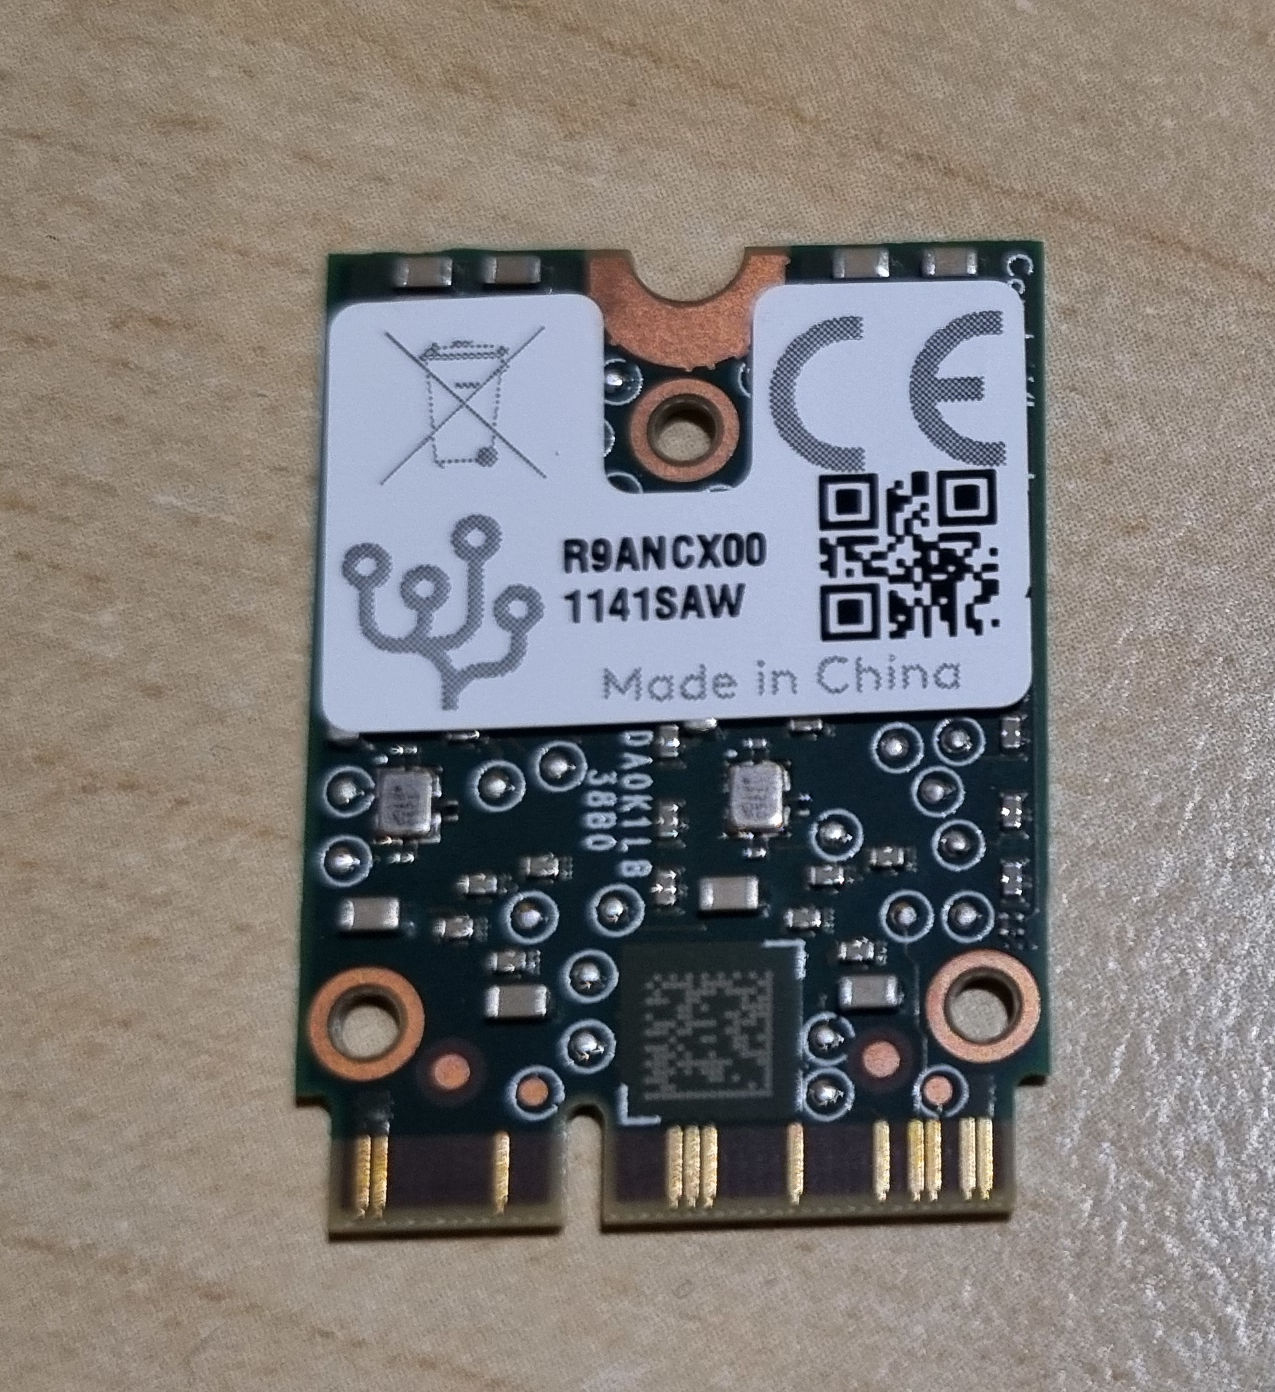
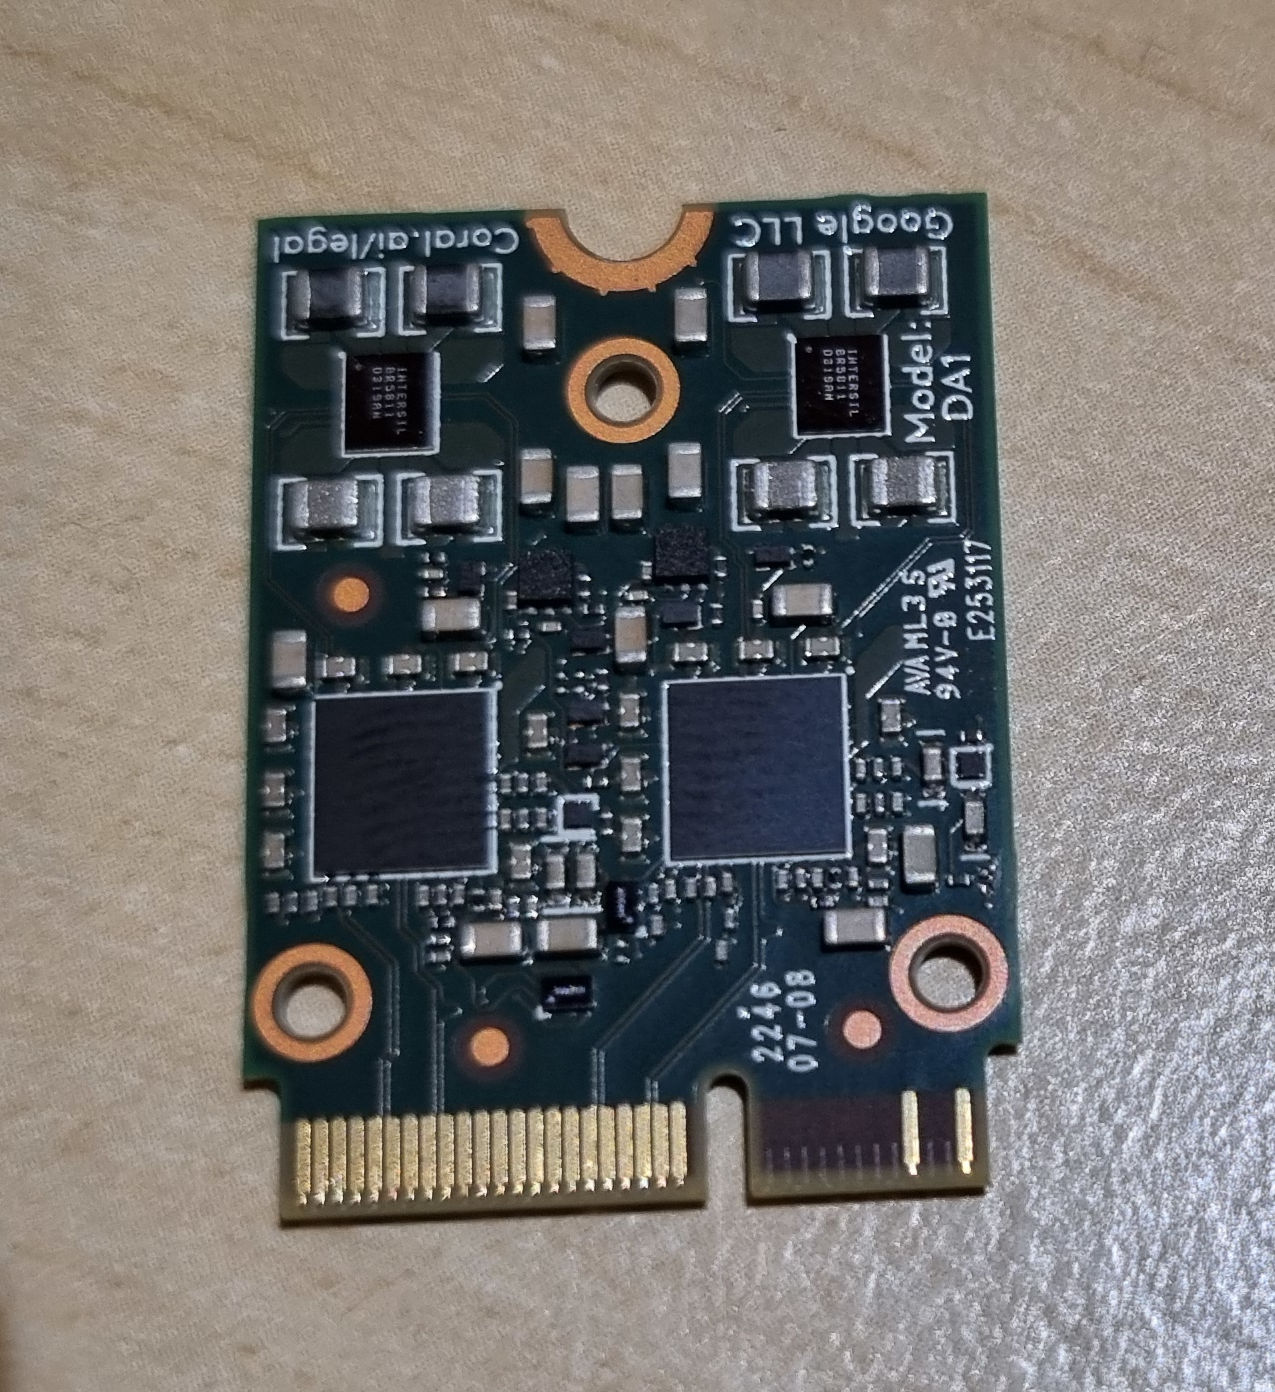
Coral TPU
Frigate actually recommands using such a TPU since they provide more performance and reduce the latency. The most recommanded TPU is the Google Coral TPU which is very well integrated in Frigate. It’s however not easy to source it at a reasonnable price, unfortunately. I eventually found it at a not so reasonnable price on Mouser.com.
The OrangePi5+ supports 2 M.2 ports :
-
1 M.2 Key-M slot that supports NVMe SSD
-
1 M.2 Key-E slot that supports the WiFi adapter.
In theory, the Coral TPU (M.2 Accelerator with Dual Edge TPU) should be compatible with the KEY-E slot, but at that point, I had no idea if it would actually work on ARM64 Linux and through Proxmox.
TL;DR: it works! … but not out-of-the-box. And only one of the 2 TPU is actually detected.
So far, the Linux kernel detects that a PCIe device is connected on the M.2 slot, but it doesn’t have any driver to support this device.
Fortunately, Google provides the sources of their driver that we can build for our kernel. A bit scary if you’re not used to build your own kernel. But, as I said earlier, Armbian allows us to easily build our own version of Armbian with our own patches. We’ll use this feature to build the Coral TPU driver into the Armbian kernel.
Build Armbian with the driver for the Coral TPU
Please note that this is the 1st time that I do this kind of thing and that I’m absolutely not an expert when it comes to buidling a kernel and using Armbian build script. Feel free to let me know if there’s a better way to do this!
The Armbian Linux Build Framework is the tool that is used by the Armbian team to automitcally build images for so many computers and SBCs. The good thing here is that they make this tool available to all users and developers so they can customize their own build of Armbian.
Using this tool, you can for example add support for a board that is currently not supported, or customize the build for an already supported board : install another kernel, edit the kernel configuration, install other packages in the image are some examples of customizations the build tool makes possible.
In order to install the driver for the Coral TPU, we’ll
-
clone the git repo
-
add a few user patches that contains the Linux driver
-
customize the kernel configuration file to enable this driver
-
build the new kernel together with a whole new image that integrates this kernel.
Let’s get to it and start by cloning the repo:
git clone --depth=1 --branch=main https://github.com/armbian/build
This will download the framework into a folder named build.
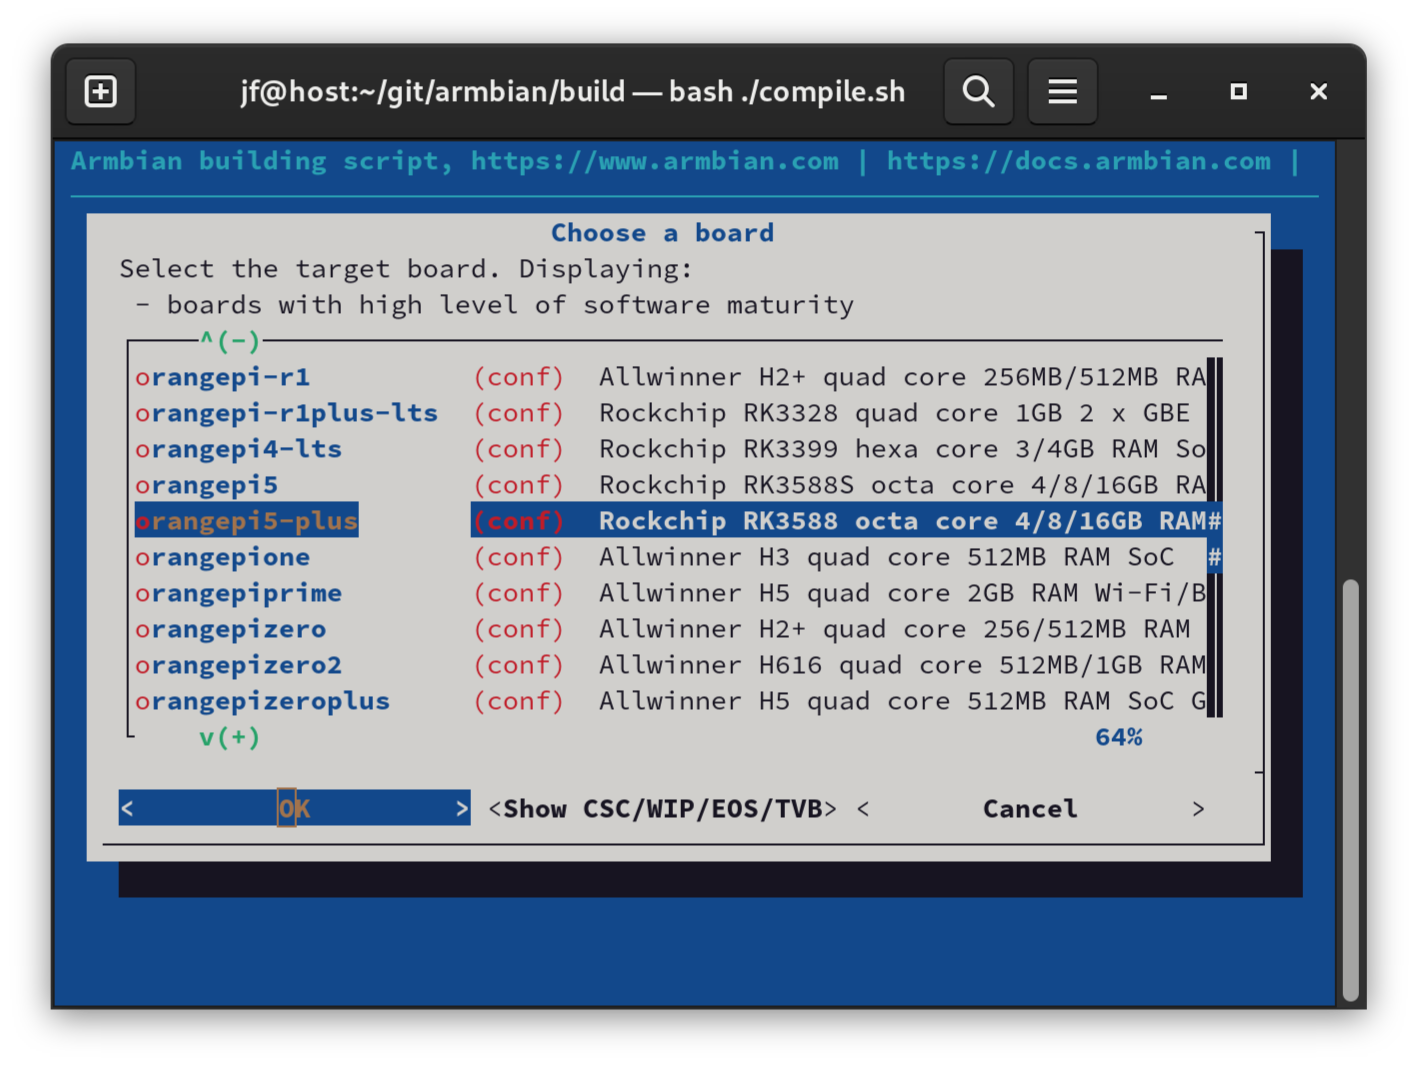
At this point, you can launch the build tool by just running ./compile.sh. This will open a pseudo graphical UI that will guide you through different configuration steps before actually building an image according to your settings.
As an example, you can build an image similar to the ones that are provided by Armbian by using the following settings:
-
Kernel configuration : Do not change the kernel configuration
-
Board : orangepi5-plus
-
Kernel : edge (This is the mainline kernel, while the legacy one is based on the Rockchip BSP and on kernel 5.15)
-
Release package base : bookworm
-
Image type : Image with console interface (server)
So now, let’s customize the build environment to add the Coral TPU driver! This procedure is based on the installation procedure from Google For this, I created 3 patch files
-
gasket-driver.patch . It basically contains the driver from Google converted into a patch file
-
gasket-makefile.patch which makes sure the driver will be compiled
-
gasket-kconfig which adds the driver in the list of options that you can enable and disable at build time
Those files must be copied into to the userpatches/kernel/rockchip-rk3588-edge.
We also need to provide a kernel configuration file that activates the driver:
- copy the original configuration file into the
userpatchesfolder:
cp config/kernel/linux-rockchip-rk3588-edge.config userpatches/
- Enable the driver:
append "CONFIG_STAGING_GASKET_FRAMEWORK=y" > userpatches/linux-rockchip-rk3588-edge.config
append "CONFIG_STAGING_APEX_DRIVER=y" > userpatches/linux-rockchip-rk3588-edge.config
Then run ./compile.sh again. Now, the build framework will automatically apply the patches and the custom kernel configuration from the userpatches folder. When the build is finished, you’ll find a brand new image in output/images which you can install on your board. If, like me, you don’t want to start once again from scratch, you can simply copy the kernel packages (output/debs/linux-headers-edge-rockchip-rk3588_24.2.0[...].deb and output/debs/linux-image-edge-rockchip-rk3588_24.2.0[...].deb) to your OrangePi5+ board and install them.
After a reboot, the Coral TPU should be detected by the Linux kernel. You can check that with the following commands:
$ lspci -nn | grep 089a
0002:21:00.0 System peripheral [0880]: Global Unichip Corp. Coral Edge TPU [1ac1:089a]
$ ls /dev/apex_0
/dev/apex_0
Using the Coral TPU from an LXC container
So now, the TPU is detected on the host system, but I would like to use it from the LXC container I created at the beginning of this post. Passing the device through to a container is much easier than to a VM since containers basically share the same kernel with the host. So it’s just a matter of configuring the container correctly.
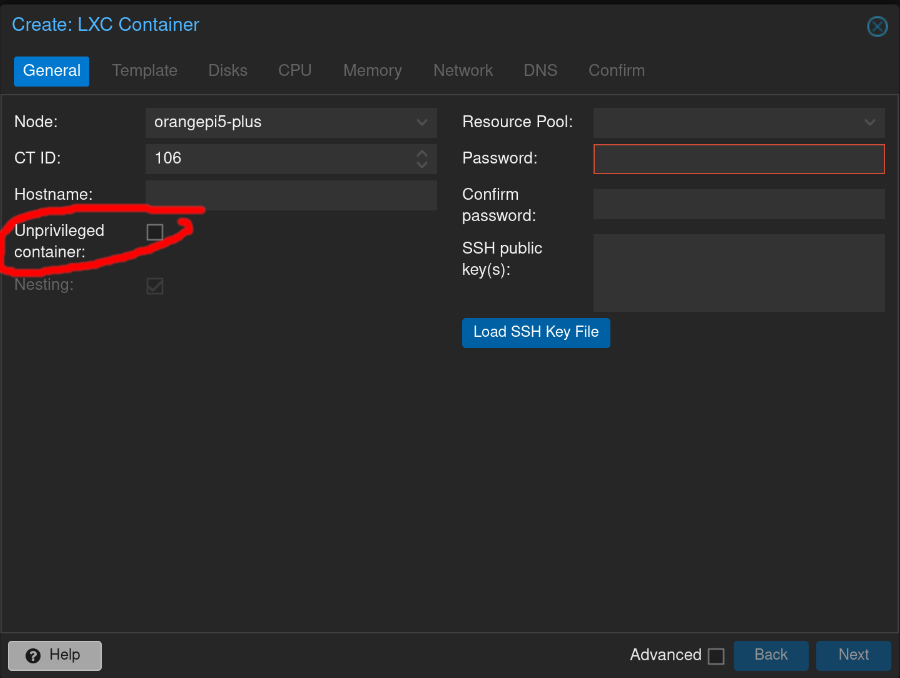
First, the container must be a privileged one. I don’t exactly know what that means, but the container won’t be able to access to the device if it’s not privileded. This setting must be specified when creating the container.
Then you’ll need to edit the configuration file of the container manually. The configuration file is located in /etc/pve/nodes/<NODENAME>/<CONTAINER>.conf. For example, the name for my container 101 on my node named orangepi5-plus is /etc/pve/nodes/orangepi5-plus/lxc/101.conf. Edit this file and add this at the end
lxc.cgroup2.devices.allow: c 120:* rwm
lxc.cgroup2.devices.allow: a
lxc.cap.drop:
lxc.mount.auto: cgroup:rw
lxc.mount.entry: /dev/apex_0 dev/apex_0 none bind,optional,create=file 0, 0
lxc.apparmor.profile: unconfinednd:
Now, start the container and edit the configuration file of Frigate (config.yml) and add this at the end of the file : it specifies to Frigate that it should use the Coral TPU to run the detection algorithm.
detectors:
  coral:
    type: edgetpu
    device: pci
Save the file, and restart Frigate. The following lines in the logs will confirm that the TPU is detected and used by Frigate:
2024-01-20 11:13:39.434363436  [2024-01-20 11:13:39] frigate.detectors.plugins.edgetpu_tfl INFO    : Attempting to load TPU as pci
2024-01-20 11:13:39.505662609  [2024-01-20 11:13:39] frigate.detectors.plugins.edgetpu_tfl INFO    : TPU found
You can also check this in the web UI, in the System panel:
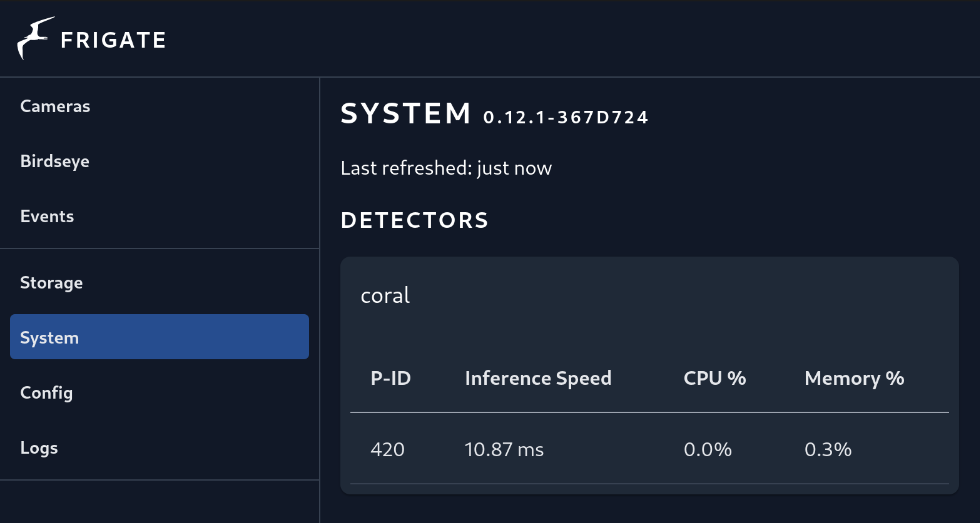
And that’s it! I’m currently using a single camera, and CPU usage is very low. I’ll probably buy a couple of better quality cameras and install them around my house!